30 Days Into Blender: The Tips That Actually Helped Me (Coming From Cinema 4D)
By The French Monkey · 2025-07-26 · TUTORIAL
I wanted to share some of the tips that helped me while learning Blender. If you've been thinking about getting into it, or if you come from Cinema 4D and want to try a new software, these will definitely help you out.
I started Blender exactly 30 days ago, and I know that because I've been doing one project every day since. All 30 of them are in the Blender project file library on my site, open-source files you can download and dissect: dig into the node systems and learn exactly how each one was made. And if you want even more, my Patreon hosts my Behind the Scenes Blender series, where I break down every single project file I've released, node systems, texturing, lighting, and a lot more tips.
Everything in this post is demonstrated in the video below, so watch along if you want to see each tip in action:
Tip 1: Build Your Own Startup File
My Blender doesn't open with the default cube. It opens with everything already configured the way I want: render settings dialed in (max samples, denoising, Fast GI Approximation to speed up renders, Simplify enabled), everything set to GPU, the compositor ready, color management on AgX, and my resolution and aspect ratio already set so any camera I drop in frames correctly. In my preferences I'm also running the new Vulkan backend from the 4.5 update.
Making your own startup file is simple: set up everything exactly how you like it, then go to File → Defaults → Save Startup File. Since I open Blender every single day, this alone has saved me an enormous amount of repeated setup.
Tip 2: Don't Fear the UI, Learn the Window System
I was always a little afraid of Blender's UI, but it's actually very smart once you understand the tab system. You can rearrange windows freely, and if you hover over the corner of any window, you can drag out an entirely new one. Any window can become any editor type, so you can, for example, keep the Compositor open next to a second viewport, render your object in one, and keep working in the scene in the other. I love how this works.
The downside: Blender leans heavily on shortcuts, and I'm not a shortcuts person. Thirty days in, I use exactly one, Shift+A to open the node search. That's it, and I'm getting along fine.
Tip 3: Turn On Cavity in the Viewport
This is one of my favorite discoveries. The cavity feature gives all your edges a subtle bevel-like highlight in the viewport, making the geometry much easier to read, similar to the wireframe view we relied on in Cinema 4D, except here it actually looks nice.
To enable it: open the viewport shading dropdown (the arrow next to the shading modes) and you'll find the cavity option, with a slider to increase the effect. You can also customize your object's viewport color, though I keep mine plain. Pure eye candy, and I use it constantly.
Tip 4: Modifiers Work Differently Than in Cinema 4D
In Cinema 4D, modifiers live in the layer menu, drag one onto an object and tweak it. Blender takes a different route: select your object, go to the Modifier tab, and click Add Modifier. From there you can stack them, for example a Decimate to remesh a sphere, a Wireframe on top of that, then a Subdivision Surface. The stack order matters and you can reorder modifiers freely.
Two smoothing gotchas worth knowing:
• If your subdivided mesh still looks faceted, right-click the object → Shade Smooth. • Alternatively, you can do it in Geometry Nodes: with the object selected, create a new node tree and add a Set Shade Smooth node. Interestingly, this node gives the same output regardless of where it sits in the modifier stack.
One important thing I learned: modifiers can't be used inside Geometry Nodes, so you'll need to figure out what comes first in your setup.
Tip 5: Geometry Nodes Are Awesome
Since we're on the subject, Geometry Nodes are just wonderful, and surprisingly easy to get into. I'm currently rebuilding MoFractal, a plugin I originally made for Cinema 4D, entirely in Blender's Geometry Nodes. I've already exposed a full set of custom sliders and options in the modifier tab to drive the fractal-style extrusions. I can't wait to talk about it properly once it's done, it deserves its own post.
Tip 6: Rotating Lights Around Your Object (the Null-Object Equivalent)
In Cinema 4D, you'd create a null object and drag your light inside it. Blender's equivalent:
1. Add your light (e.g., an area light) and position it. 2. Add an Empty → Plain Axes. 3. Shift-select the light, then the empty. 4. Right-click in the scene → Parent → Object.
Your light is now parented to the empty, so rotating the empty swings the light around your scene. With a camera active, this is a great way to watch your lighting setup change in real time.
Tip 7: See Glare and Bloom Directly in the Viewport
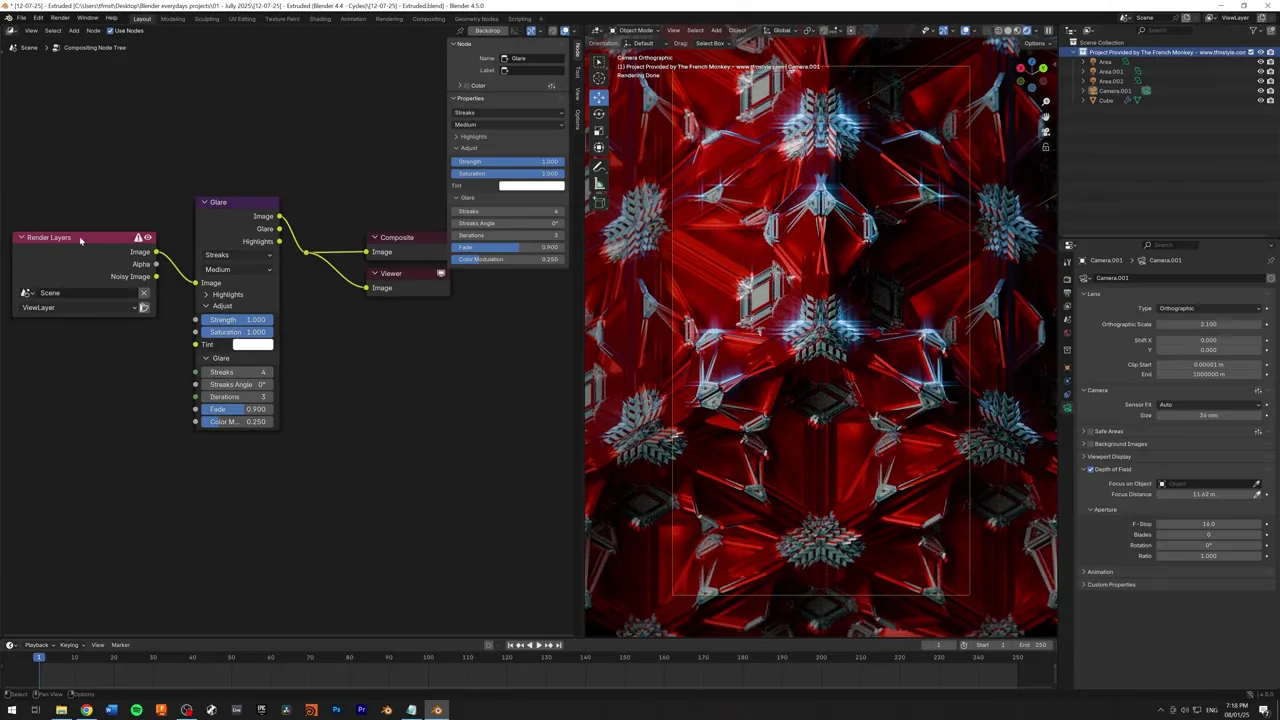
This one I had to figure out on my own. I couldn't understand why my glare wasn't showing up in the render view, until I found that in the viewport shading dropdown, you can set Compositor → Always. With that enabled, the viewport shows whatever your compositor is doing live.
The compositor is where your post-processing lives, in my case the Glare node, with controls for bloom, strength, saturation, and size. Before finding this, I was doing test renders just to check how the glare affected my scene. Now I see it live. Absolute lifesaver, especially as you stack more elements in your compositor.
Tip 8: The Sky Texture
Adding a sun light is easy, but I wanted an actual sky. For that, go to your World settings, click the color field, and choose Sky Texture. You get controls for sun size, sun intensity, and sun elevation, plus different sky types, and since the sky texture includes its own sun, you don't even need a separate sun light.
To edit this as nodes: open the Shader Editor and switch the mode from Object to World. From there you can go further, plug in a Noise Texture to add variation to the sky, and run it through a Color Ramp to control the colors. Great stuff.
Tip 9: Camera Composition Guides
Almost every software has composition guidelines, but in Blender I had to hunt through the camera settings to find them. With your camera selected, go to Viewport Display → Composition Guides, where you can enable a whole set of guides (thirds, center lines, and more) to help frame your shot. If the lines are hard to see against your scene, switching the viewport to a clay/solid render makes them much more visible.
The one downside: Blender currently gives you no way to change the color or thickness of these lines. I'd love that option, but for now, it is what it is.
Tip 10 (The Big One): Learn From Open-Source Project Files
The most important tip I can give you: my everyday project files are open source. Download them for free, use them however you want. I make them first and foremost as my own research, I love digging into different systems and learning how they work, and I share both the results and the files.
When I don't know what to create, I grab one of these files and start from somewhere instead of a blank scene. I even reuse across software: for some Blender landscape projects, I pulled textures straight out of my old Cinema 4D project file library.
Where to Go From Here
There's a lot of freely usable content on my site, and if you want deeper insight, the Behind the Scenes Blender series on Patreon walks through every project file I've made since day one, that's also the best way to support this work and join the community.
I also make products for designers: grayscale maps usable in pretty much any software for applying all kinds of patterns, pre-built landscape maps that work great in Blender, and a library of pre-made 3D assets.
Hopefully this helped you get started in Blender. See you in the next one, cheers!